Cement Tile on a Budget
- May 14, 2019
- 5 min read
Updated: May 14, 2019


Photos from Cement Tile Shop
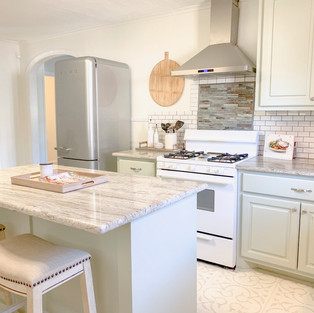
If you have opened a design magazine, visited a tile showroom, or scrolled through pinterest lately you may have noticed some bold new tile designs. Over the past few years I have worked on new builds, flip homes, and remodels where we have added this fun element. I love the whimsical kick these tiles can give a room. With all the choices out there it can be a little intimidating to pick a design that you can see loving for the next 10 years or more in your home. The cement tile shop has a huge selection online here. Always ask to take samples and see how they will look in your home next to paint colors, wood flooring, bathroom tiles etc. If you are installing in a project such as a new build or renovation where you would have been installing flooring or some other tile, these tiles can run the same or slightly more cost wise. But, if you are looking to make a change in your current home and don't want to live through the demo of ripping up old flooring/adding new or don't have the budget to do so, you can achieve this same look with paint. Here are a few photos of some projects I have done with paint and stencil to get that cement tile look but for much less!


I've gotten a lot of questions about how I did this so I decided to do a blog post with instructions. These instructions are for tile flooring or tile surround. You can also do this on other surfaces such as walls, linoleum, etc. For more info and videos on how to use stencils click here. I ordered two stencils for each project. You will want to have one extra that you can bend and cut for the tricky corner spots. For the fireplace project I ordered the Augusta Tile from Cutting Edge Stencils. For the kitchen floor project I ordered the Scandi Tile Stencil from Stencilit on Etsy. You will need to measure your tile prior to ordering. Both sites allow for custom orders on the stencil size but it does take a little longer to come in. It doesn't have to be the same size as your tile but for mine I wanted to make my project as simple as possible so I ordered the exact size.
Items needed; microcloth for dusting or swiffer cloths, rubbing alcohol, 220 grit sanding block 2-3, dense foam rollers (large and small if you are covering a large area), primer, base coat paint, paint for stencil design, stencil, small painting brushes for touch ups
Step 1. You will want to sand the surface with a 220 grit sanding block or tool.
Step 2. Clean the surface really well. Vacuum really well after sanding, then used a microcloth/swiffer duster to get the excess dust, and finally some rubbing alcohol to make sure there is no residue on the tile.
Step 3. Apply painters tape to any surrounding areas your want to keep paint free; baseboards, walls, wood trim on floors.
Step 4. Apply your primer. I used Zinsser Bulls Eye 1,2,3 Primer. Apply one coat, let dry and apply a second coat. Allow to dry based on directions on primer can.


Step 5. Paint your base color. You can use any type of paint that is a low gloss. Many people like to use chalk paint but for both projects I used a regular paint I had used for my walls and had left over. I didn't want to spend extra money on paint when I had plenty sitting in the garage. It also matched my baseboards and wood trim on the fireplace so it worked out great. Allow your base color to dry for at least 2-3 days. This will allow the paint to cure. I would not recommend walking on the area or utilizing the area while you are in the process of painting. The paint is very easy to scratch at this point because you haven't applied the protective top coat.
Step 6. Begin stenciling your pattern onto the tile. You have to use a very light touch when putting paint down with a stencil. Otherwise it will bleed and cause a mess. If using a foam roller, roll it several times onto a paper towel before rolling across the stencil to apply to the surface. If you are using a paint brush, dab excess paint onto a paper towel before applying. I watched a lot of how to videos on you tube before starting. I suggest you do the same. I used the Kilz Chalk Paint in Toasted Poppyseed for the fireplace. For the kitchen floor I used a light grey that had been leftover from the previous home owner. I can't remember the color but I tried it and it went well with the grout on the backsplash and the silver Smeg fridge. You can also use multiple colors in your stencil pattern. Shown here on cutting edge stencil site. It will take longer but if you have a small area it's definitely worth a little extra time.


Step 7. Allow 1-2 days for the paint to cure. My little helper above :)
Step 8. Clean the surface really well with a swiffer. Get ALL dust off the area before you apply your protective top coat. Make sure to only use a water based polyurethane, if you use other types for wood floors it will yellow and ruin your masterpiece! You can use any finish you would like; matte, gloss, high gloss. Apply 2-3 coats. For high traffic areas I suggest 4-5 coats. You will want to let it dry between coats and sand any bumpy/bubbly areas. The polyurethane is what protects the floor from scratching and being ruined over time. If you skip this step your floors will scratch quickly.
This project is no small feet! But it only takes about a week total (only because you have to allow paint to cure) if you are doing it after work or in your free time. It costs about $50-$150! You can't beat that for changing the whole look of a room. It's typically $1,000 or more to remove and replace existing tile even in a small area such as a fireplace. Unless you want to diy but I'm not on that level yet! I was so happy with my finished product on both of these and got so many compliments! I'm about to start on my current fireplace but need to choose a stencil pattern and colors. Please feel free to comment below with any questions you may have about the process. Thank you for visiting my blog :) Follow us on Facebook at Southerly Real Estate and on Instagram at Southerly_la


Tài xỉu Sunwin mình bấm vào xem thử vì nghe nhắc hoài, chủ yếu tò mò giao diện thôi. Vừa vào là thấy trang làm khá “sạch”, màu sắc phối nhìn dịu mắt nên lướt một lúc không bị mỏi. Nội dung cũng chia theo từng khối rõ ràng, kéo xuống là biết mình đang đọc phần nào chứ không phải bấm qua lại nhiều. Mình có thấy họ nhắc chuyện hoạt động từ 2016, đọc lướt qua kiểu thông tin được trình bày gọn gàng nên cảm giác đỡ lăn tăn hơn. Dùng trên điện thoại cũng ổn, chữ không bé quá, tiêu đề nổi bật nên tìm ý chính nhanh. Nói chung cái mình thích nhất là cách…
tài xỉu md5 hôm bữa mình lướt thấy nhắc nhiều quá nên tò mò vào xem thử trang họ viết gì. Mình không đọc sâu đâu, chủ yếu xem bố cục có dễ theo dõi không vì mấy trang kiểu này hay rối. Ai ngờ nhìn khá ổn, họ chia nội dung theo từng khối ngắn nên cuộn xuống không bị ngợp, tiêu đề cũng đặt rõ nên biết đang ở phần nào. Có đoạn họ nhắc về bảo mật kiểu SSL 256-bit, mình đọc lướt vẫn nắm được ý chính chứ không phải kiểu nhồi chữ. Nói chung cảm giác như trang này ưu tiên người mới, không bắt mình phải mò mẫm quá lâu để hiểu. Mình thích…
nohu mình vừa lướt thử vài phút vì thấy bạn bè nhắc hoài, kiểu vào xem giao diện ra sao thôi. Ấn tượng đầu là trang nhìn khá thoáng, chữ dễ đọc, các mục chia khối rõ nên kéo xuống không bị rối mắt. Mình có thấy họ để thông tin RTP ổn định trên 96% ngay phần giới thiệu, nên người mới nhìn phát hiểu họ muốn nói gì. Ngoài ra đoạn nhắc SSL 256-bit cũng đặt khá dễ thấy, không phải mò sâu trong mấy trang phụ. Mình không có ngồi đọc kỹ hết nội dung, chủ yếu xem cách họ trình bày và điều hướng. Menu trên đầu trang với các tiêu đề mục được làm nổi,…
789win vip mình ghé thử vì thấy nhiều người nói, nên tò mò xem giao diện có dễ dùng không. Vào trang đầu tiên cảm giác khá gọn, chữ rõ ràng, mấy khối nội dung tách ra nhìn không bị rối nên lướt nhanh vẫn bắt được ý. Mình để ý họ có nhắc con số cộng đồng hơn 5.500.000 hội viên, đọc qua thấy cũng thú vị chứ không kiểu nhồi nhét. Cuộn trên điện thoại ổn, không bị giật, các tiêu đề chia đoạn nhìn phát biết đang ở phần nào. Nói chung mình thích kiểu trình bày thoáng, khoảng trắng vừa đủ nên đọc lâu không mỏi mắt, nhất là mấy heading về lịch sử và quá…